Saturday, May 25, 2013

They Bolted!

Can't beat the heat

A few hot days in May and everything starts to bolt!  If you are unfamiliar with the term...let me splain.  No it's to much...let me sum up.  When a plant "bolts" it means it is going to seed.  OrganicGardening@About.com does a lovely job defining "Bolting." Typically, lettuce, spinach or some more tender leafy greens will suddenly sprout a flower stalk and in just a few days, there is a lovely flowering plant where your spinach used to be.  Or in my case, spinach, arugula and cilantro...all bolting with a few days of each other. The cilantro is quite beautiful once it has gone to flower.  I left a few standing to aid in keeping the evil doers (bad bugs) away, but the heavy rain over the past few days quite literally beat it down and only 1 still stands.  I described this to my friend Robin, who is starting her first garden this year (DO YO THANG!) and her response was, "What's the point of growing them?"  Well, that is an excellent point.  One cannot determine what curve ball nature will throw our way on any given day, much less any growing season.  

So what is the point of growing these beautiful greens if only a few short weeks after you may have dropped them into the ground, they are bolting and gone for the season?  

That is one hell of a heading!  Well, as a wise man (or woman for that matter) once said, "Timing is EVERYTHING."  It is important that you take into account the information that is widely available regarding the types of plants you grow and the approximate dates they should be planted.  Many times that information is right on the back of your newly purchased seed packet...and then there are other times when you have seeds and there is no information whatsoever on when and how to plant them.  Please see below.
On the left, lots of useful information...on the right, zip, zilch, nada.  
So, there you have it.  What to do?  This type of situation is exactly what the interwebs were made for!  There are tons of sites that will give you planting information based on what zone you are in.  Does anyone know what I am referring to when I used the term "ZONE?"  Zone refers to the USDA Hardiness Zones and The Vegetable Garden.info offers a great resource of information on timing for all varieties of plants.  Just punch in your zip code, and they will give you your USDA Hardiness Zone, then simply click on the zone you are currently residing in, on their website and up will pop a long list of plants and timing.  As my son Fletch would say, "Easy peezy, lemon squeezy."  


Here is the Sisk Family Farm as of 5/20/13.

Here are my Mortgage Lifter Tomatoes (left) Super Sweet Cherry Tomatoes (right of center), Sweet Banana Peppers and Red Bell Peppers (right edge).

Mesclun greens in front, Mustard greens next, Champion Radish behind and to the left.

My pride and joy...Lupine, flowering beautifully!

Arugula (left), Lupine behind (you can see the one and only flower), Red Russian Kale, Tuscan Kale, more Arugula and finally Yellow Onions.

Other half of the earlier bed, Romaine (left), Lolla Rosa, Peas behind them and the Spinach and Cilantro in the rear, just prior to being harvested for the last time this spring.  I created a trellis for the peas to grow up on and they seem to be utilizing it as I had hoped.  I snuck in some Sweet Corn that I started in my basement in late winter between the peas and cilantro.  It is hard to see, but I hope that changes in the next few weeks.  

Last but not least, Pac Choi (left), a singular flowering Broccoli Rabe, Chinese Kale/Broccoli in the center and Chard on the right.

Many, many, many leafy greens and root vegetables can be grown both as a spring crop and again as a fall crop.  This especially goes for Radish and my favorite Spinach (try a Spinach Cesare salad...delicious!).  They will be back!  

The weather is perfect for planting...and so I am off to sow some Black Valentine Bush Beans, Blue Coco Beans, Hericot Vert Bush Beans, Champion Radish, Mucher Cucumber, Nasturtium and Yukon Gold Potatoes.  

Wish me luck!


Thursday, May 2, 2013

Spring Has Sprung

Here comes the sun...do da do do!

Or something like that.  Well, there have been a handful of beautiful days recently.  Even one day that hit near 80 degrees...according to the Subaru Forester!  

Farewell, My Subaru...great book.  

Here is a snap shot of what my garden looks like as of a few days ago.
On the right, Chard, moving left is Chinese Broccoli, and then Broccoli Rabe.  These guys were casualties of frost earlier this spring...it was a miserable morning.  This sad event has been well documented in this blog.  I really need to just get over it!  Ok...I'm over it.  In the last row on the left is Bok Choi, seeded a few weeks ago and doing just lovely.  Chinese Broccoli (or Gai Lan) seems to be recovering well from the wounds of the overnight chill, Chard is doing fine, but Broccoli Rabe...they were hurt pretty bad.  I had such high hopes for these guys.  You might notice some plastic sheeting and the wood slats on the edges of the garden.  I used the plastic after that first frost to protect the seedlings over night from the next few frosts.  I made one big mistake...I left the plastic on during the day light hours on 2 occasions.  BIG MISTAKE!  I drove the temperature up so high under the plastic that the surviving Rabe decided to bolt...and I don't mean run away!  They began to flower...way too early!  And so, I have mostly puny, plants with florets and full blown flowers growing.  There are 1 or 2 guys I am looking forward to.  Not all is lost.  


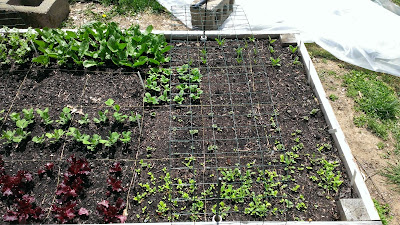
In this bed is Yellow Onions on the right, Champion Radish and Corvair Spinach, then seeded Arugula, Red Russian Kale and Tuscan Kale and in the left row is Lupine and more seeded Arugula.  This is the first year I am growing Onions, any type of Kale, or any type of perennial flower like Lupine.  I figured if I can grow veggies for my family, I can grow landscape plants for my home.  The onions were started from sets, basically small onions grown the previous season (think pearl onions).  Again, you see the plastic, but on this bed I used green fencing cut to size and rolled over the top of the bed as a sort of hoop house.  GENIUS!  All is well in this bed.  I already harvested a few radishes and they were GRRRRRREAT...like Tony the Tiger.

My pride and joy!  My very first raised bed I built last year.  This guy is solid and is doing fantastic!
This is the rear of the bed, with Romaine and Lolla Rosa in the front, Snap Peas behind, and Cilantro and Corvair Spinach in the back.  I am still amazed at how well the Cilantro and Spinach are growing...these guys are the winter survivors originally planted last September in another bed.  I transplanted them with little hope they would thrive.  There will be salsa in the Sisk house this year!
This is the front of the bed and mostly seeded crops.  At the bottom is Mesculn Greens, then Mustard Greens, more Champion RadishKaleidoscope Carrots, and finally Razzle Dazzle Spinach.  I planted a great deal of spinach!  It is good for you...so we will eat spinach!  

Plastic Lesson Learned

My intentions were good, as my wife would say.  I wanted to protect my plants from the frost utilizing cold frames, hoophouses, mini green houses...whatever you want to call it.  I succeeded in saving an a great deal of plants from death my mildly chilly weather, but I also cooked some veggies prematurely by lazily leaving the plastic on during the day.  The Broccoli Rabe got the wrong message and decided that their growing season was nearing its end.  Grow Organic has a great article on making a hoophouse for your garden, and as always, my boy Mike McGrath (host of You Bet Your Garden)and the Gardens Alive website has some excellent information on hoophouses/row covers to extend your growing season.  I hope my mistakes help in some twisted way!  Peace.


Tuesday, April 23, 2013

Seedlings and Stuff

Spring is for lovers...of gardening

March is finally time to get outside and see what's happening in and around my garden.  I did spend a bit of time a week or two ago pulling weeds and leveling my raised beds.  In my earlier post I spoke about my unfortunate situation with the latest frost this spring.  Patience is a virtue...and one that I have not inherited from any member of my family.  Many of my seedlings have grown quite well this year and I sprouted some snap pea seeds (patting my own back) and so it is time to transfer them to the garden.  

The snap peas were sprouted indoors, but not in any growing medium.  There is a trick to sprouting peas with out using any seed starter, all you need is a paper towel, zip top bag and water.  Take a doubled up paper towel and give it a good soaking, not dripping, but thoroughly wet.  Lay it out and put your pea seeds on the wet towel and fold it over.  Fold over the sides like a little paper purse and slide this into the plastic zip top bag.  Zip it about 2/3 of the way and mark the date.  Check them every day and add water to the towel as needed to keep it very moist.  In a few days, usually no more than 3 or 4 the seeds will poke out their initial root and they are ready for the garden.  These were much easier than the seed starting I did in my basement/garden center.  
Spinach, Shasta daisy, Red bell peppers, Basil in front; Viola, Lavender, Banana peppers, Parsley in rear 
Romaine, Chinese broccoli, Broccoli Rabe, Lupine, Lolla Rosa in front; Tomatoes in rear
All and all, seed starting was a success!  Time to transplant and so I took a trip to the Lawrence Township Ecological Facility and picked up about 1 1/2 yards of compost (black gold...great quality and best of all, FREE to Lawrence Residents...most townships in NJ will have a comparable facility) and sprinkled the fairy dirt over my raised beds to feed the newly planted and new to be planted seeds and transplants.  
Swiss chard and Lolla Rosa
After the Chard, Broccoli Rabe, Chinese Broccoli frost debacle, I was gun shy on moving anything else to the garden.  But after a bit more research, there are certainly some candidates that are ready, like Radish.  So off they went.  And by early April, I had moved a large variety of seeds and transplants into the garden.  I direct sowed a variety of seeds: Mesculn Greens, Mustard Greens, sprouted Snap Peas, Kaleidoscope Carrots, Champion Radish, Arugula, Red Russian Kale, Tuscan Kale (Thank You Shannon), Bok Choy, Razzle Dazzle Spinach, mixed varieties of Basil, Tomatoes (again, way way way too early to plant these) Romaine, Lolla Rosa, Lupine, and...I think that is it.  Wish me luck!
Corn in front, radish in rear.
I cannot wait to get this sweet corn in the ground!

Wednesday, April 10, 2013

January 2013

Seeds of Exchange!

This year I decided to do a bunch of research pertaining to seed starting indoors.  After 3 failed attempts (if one would refer to the past feeble starts as attempts) this year would be different.  I began with ensuring I had the proper light sources.  I ventured into my basement and pulled together all of the shop lights I had.  There were 3 48" light fixtures and each required 2 48" t-12 40 watt fluorescent bulbs.  

The light looks just light this guy does.  After checking them all out, only 2 of the 3 worked and so I began with these.  My radio friend, Mike McGrath has plenty to say on the subject of starting seeds indoors on the Gardens Alive A-Z Archive. Especially concerning the type and amount of lighting necessary.  It turns out that most newer shop light fixtures require t-8 32 watt 48" bulbs and these light are more efficient than their elders, the t-12's.  You go to seed starting with the lighting you have and not the lighting you want...so here I went.

I began my seed starting adventure in early February.  I had saved a number of containers of all sizes from last years garden purchases and so I had my beginnings at home.  I took great care to clean each container with a bleach and water solution (1 part bleach, 9 parts water).  Soaked them for a few minutes and rinsed them thoroughly.  I purchased a bag of Jiffy Seed Starting Mix (Organic) from my local Wegmans (I LOVE THAT STORE!).  This mix's primary ingredients are spaghnum peat moss and vermiculite, with some trace additions.  These two ingredients are essential to ensuring a light and airy mixture for seedling roots to move through easily.  

And so, on February 12th I sowed Chinese Kale (hybrid broccoli/kale), Broccoli Rabe, Lupine and Delphinium (these two are perennial flowers).  These were pretty much chosen a random, because my seed collection had grown quite large over the last year and they all took a while to germinate (I have managed to collect about 25-30 seed packs).  Four days later, I ventured into just about every garden center I knew looking for some seed starting trays...needless to say, mid February may be a bit early for these places to be stocking them, I guess.  I did mange to find one place that had some items left over from last season and so I picked up 2 Jiffy Seed Starter Green House kits (each has 72 pods for seeds).

I also grabbed another bag of Country Cottage Seed Starter from that same nursery.  This mix also had sphagnum and vermiculite as the primary ingredients.  On February 16th, I sowed Mortgage Lifter Tomato (an heirloom variety), Swiss Chard, Lavendar, Sweet Basil, Romaine Lettuce, Lolla Rosa, Red Bell Pepper, and Corn (I learned later it was WAY WAY WAY too early to sow tomato and corn...WAY too early).

I was running out of light and so I purchsed a 48" 4 bulbs shop light that utilized t-8 bulbs, as I mentioned earlier...and with that I started my 3rd tray of seeds.  I sowed Corvair Spinach, Razzle Spinach, Super Sweet Cheery Tomato (hybrid cherry), Champion Radish, Parsley, Johnny Jump Up Viola, Shasta Alaska Daisy (both perennial flowers) and Banana Peppers.  

There is tons or information available on the interwebs regarding starting seeds indoors.  Organic Gardening offers a great resource for determining the necessary tools, supplies and seeds for getting a great start indoors...and timing.  Timing is everything!

With a very few exceptions, nearly everything germinated as I had hoped (Delphinium and Razzle Spinach were tougher than expected).  I transplanted nearly all by mid-March and began hardening seedlings like Chinese Kale, Broccoli Rabe, Swiss Chard, Romaine, and Corvair Spinach.  After about a week of letting these specimens get used to the outdoors a bit at a time, I planted all but the spinach.  THEN THE FROST CAME THAT VERY EVENING!  Everything had damage and about half of all planting may be lost!  I had a feeling that it was early, but I grew impatient and paid dearly for it.  

RIP Broccoli Rabe.  :-(

Tuesday, April 2, 2013

2012 Harvest

Success...and failures

The 2012 growing season was by far my most bountiful...but I did learn a great deal about what to do and what NOT to do in the garden.  I began  sowing seeds in April and I dropped a variety of plants in shortly after that.  This was a late start as direct sowing seeds season is concerned.  In very general terms, the timing of sowing seeds and planting is based on the "frost date" for any given region.  There are a bunch of websites that will give you your average spring and fall frost dates and it is this information that you should use to determine what you plant/sow and when you do it.  Moongardencalendar.com has a "Frost Dates Lookup" where you input your zip code and it will give you the average frost dates for spring and fall.  Almanac.com will do the same and go one step further, they will offer you recommended planting dates, for a variety of common garden plants, based on the frost date in your region.  

My raised bed was looking pretty good by early May with a variety of plants and sown seeds doing their thing.
Starting from the top left and going down rows, there was pac choi (directly sown), Chinese broccoli (directly sown), "Bright Lights" Swiss chard (mix of yellow, white, red chard, transplants of milk jug seedlings).
2nd row, mustard greens (directly sown), parsley and sweet and opal basil (direct sown).
3rd row, mixed salad greens (sown way too thick) corvair spinach (direct sown) and a single rosemary plant.
4th row, tomato plant (gift from a friend), a few pea plants (also gift from Shannon, woman of the earth) and a few more tomato plants and a few corn plants (gift from my sons kindergarten class), with some basil (direct sown) in a row at the bottom in front of the tomato plants.

You may notice some yellow flowers at the top and bottom of the garden bed, they are marigolds.  The fragrance of marigolds will keep away a number of non-beneficial insects without scaring away the most beneficial guys that help pollinate and keep your garden in order.  Yes there are good insects and bugs that aerate your soil, pollinate your flowering plants, eat the EVIL insects and just plain chill out with no harm done.  Bugs can be GOOD!

By June, my raised bed was doing pretty well.  Nearly everything I planted was about doubled in size, I was harvesting lots of salad greens...
as a matter of fact they were going so well, I decided that I should build two new, smaller beds and really take advantage of this newly acquired knowledge.  The new raised garden beds were 4' x 4' x 6" (about the size Mel suggests using at Square Foot Gardening).  I Immediately filled them with the same mix of compost and bagged top soil used for the larger bed.  One was sown with half corn plants, eggplant plants, 1 sage plant and 1 bay leaf plant.  The other had a few tomato plants (a gift from a good friend Michael, a Teresa Caffe friend), 1 tomatillo plant (also gift from a Michael), 2 sweet pepper plants, 1 poblano pepper plant and 8 oriental cucumber plants.  

The harvest!

Long story short, the two smaller beds produced moderately well for me.  I got 10 or so tomatoes, 10 or so tomatillos (more info on these later)
, about 2 dozen cucumbers (more than I could handle for the season) a handful of poblano peppers, nearly no sweet peppers.  The other bed gave me 10 or so eggplant, 10 or so sweet corn ears (still not good quality), and plenty of sage and bay leaf.  
Tomatillo

The larger raised bed was obviously where the bounty of the harvest came from.  Plenty of pac choi (both leaves and full heads), spinach, basil, tons of chard, mustard greens, salad greens, and a fair amount of Chinese broccoli leaves.
early Pac Choi
Beautiful specimen of Pac Choi head

Salad Greens being washed (always wash your greens)
Sisk Chard leaves (I thank my cousin Kenny for that naming)
Mustard Greens
Mustard Greens and Chard everywhere but bottom right, Chinese Broccoli leaves
I was really looking forward to my tomato harvest.  I thought that this was my break out year, that I would have so many tomatoes they would be coming out of my ears.  I was going to be canning, making sauce, salsa, pico de gallo, roasted tomatoes, sun dried tomatoes, tomato hats, tomato bags...well you get the picture.  With that type of expectation, the only way to go was down...and down it went.
Cherry Tomatoes up top, mixed Tomato varieties (mostly Heirlooms) and 4 Tomatillos
Don't get my wrong, this was 1 harvest in late July (I believe) and it was pretty impressive, but this was the most plentiful tomato harvest I had.  I gifted some of the larger heirlooms, snacked on plenty of the cherry tomatoes,  and the tomatillos went into a number of sautes I prepared.  I did not have another harvest of this quantity or quality subsequent to this.  Disease and heat dominated the later half of the summer and before long the dreaded black spots invaded just about every inch of my tomato garden. EARLY BLIGHT! (<---click here to see some more info on Early Blight).  If you check out some images of this, you can see what happens.  Heart breaking!   The season ended well over all.  I had a number of fall plantings survive the early part of the winter, pac choi, Chinese broccoli leaves, spinach, and cilantro.  Once the early part of 2013 hit and the heavy frost and snow visited, they were lost...except for the spinach and cilantro.  20 of each plant survived and have been transplanted into a new home this year.  Nature is awesome!

The 2013 season was fast approaching and it was time to begin thinking about my strategy for this coming season.  There was much to plan, much to contemplate and a new raised bed to build.  Until the next post!

Saturday, March 30, 2013

Time to plant up the garden

Seeds & plants

A renewed vigor and expectation for success was ringing in my head in the spring of 2012.  I had decided to take another shot at starting seeds indoors.  After all of the reading and listening and research done to prepare this newly constructed raised bed...
I did about 2 minutes of research at starting seeds.  This was clearly not enough to prepare me for the undertaking.  I had a 48" fluorescent shop light, a pair of t12 48" fluorescent tubes and that was about it.  The light was on some days and off others.  The seeds got water every so often and a white lovely looking moldy thing was growing all over half of the tray.  It was a half heart'd attempt at best and the fruits of my labor were evident.  I started approximately 32 pods with seeds and nearly every one of my tomatoes, basil, chard, spinach, etc., D. E. D. dead!  I did manage to get 1 tomato plant into the garden and it did live and produce a few pieces of fruit.  

Another short story...during my time in Princeton, I worked at Teresa Caffe with some truly incredible people.  A close friend Shannon, woman of the earth, and resident gardening/farming/livestock expert told me about a way to start seeds with one gallon milk jugs.  Take a plastic gallon milk container, cut it in half (horizontally) and remove the top portion with the handle.  Drill some holes in the bottom for drainage and add your favorite seed starting mix, seeds and water.  Attach the top with tape (mimicking a hinge) and...well you can read all about it here.  

It was meant to create a small greenhouse effect and it worked like a charm.  I did start some chard using the milk jug method and several of them survived the transplant into the garden.  SUCCESS!  These chard seedlings were the mainstay of the chard in my garden, for the entire growing season.  More on that chard and the successes and failures (and there are plenty of those) of my 2012 growing season to come.  Ok...here is a sneak preview!
Name that leaf!  How is that for a tease???

Friday, March 29, 2013

If you build it...they will grow

The right stuff.

My choice of materials for the construction of a raised garden bed was practically endless.  
  • cedar-wood eating insects stay away from it due to its fragrance and it breaks down very slowly
  • fallen trees or large branches-a more rustic look, but certainly earth friendly
  • any other wood- insuring that it has not been treated with any chemicals or finished with paint or stain of any kind, though this will break down/rot after a few years
  • cement blocks or natural stone-heavy and can be expensive
  • simply mound soil-atop the native soil, ensureing not to mound it too high with steep sides or erosion will destroy your hard work
  • endless other ideas that will not allow the intrusion of chemicals or toxins from the materials themselves to infiltrate your growing medium
A great article from Organic Gardening explaining how to build 5 different raised beds and of course the method I used to build a raised bed utilizing cedar lumber at Sunset.com.  Choose wisely!

Even more important and essential to a raised garden bed is what growing medium you will be filling the box with.  And again, the wealth of information available on the interwebs is endless.  Nearly all reputable sites will recommend that you use between 30%-50% compost or organic matter, and the rest is up for debate.  My boy Mr. McGrath will advise you on raised beds and exactly what should go in them, here on his supporting site, GardensAlive.com.  Square foot Gardening and it's founder Mel will recommend Mel's Mix...I will let you research what exactly that entails.  No doubt that these and many other websites offer tons of very valuable information on the contents of the growing medium that should go into a raised garden bed.  I decided on 50% high quality compost (blend of mushroom compost, composted leaves, composted manure) and 50% high quality bagged top soil (blend of 2-3 reputable brands).  

No preservatives, additives, chemicals, toxins, moisture retaining stuff, etc.


What I am about to mention is worth paying attention to.  None of the products I used, nor should anyone use, contain any type of chemical fertilizer or additive to enhance the ability to retain water or feed the plants that will be growing in the raised garden bed.  A proper compost and mulch will retain all the moisture you need and feed your veggies and flowers absolutely fine.  NO CHEMICALS NECESSARY!  Once again, my friend Mike McGrath will tell you all you need to know HERE about making, selecting and using compost rather than fertilizer on your garden.  For god's sake, he wrote a book on the subject...Mike McGrath's Book of Compost.  If you have the means, buy it, read it, compost it...just kidding.  

It took me about 2 hours to build this 4' x 8' raised bed and set it in its current location...
using the details I found on Sunset.com.  It was easy to plan for and construct and the website does a great job with the images to support each step of the process.  Again, there are tons of websites and plans online...if you were to simply search for raised garden bed plan.  <-------JUST CLICK HERE!

Thursday, March 28, 2013

Location location location

Patience is a virtue.

I spent the winter 2011-2012 and early spring 2012 watching the sun cascade over the backyard.  I finally took notice at the "original" and newly expanded garden location and how there was no way that I could have a successful growing season there.  The tree line shaded the majority of the area until after 2 PM and the sun set behind the rear trees just after 3:30 PM.  That explained a lot about why flowering plants grew so poorly, specifically all varieties of nightshades that I planted.  These plants NEED sun and plenty of it.  I believe "full-sun" is what the learned gardener would term the needs of these and many other plants that I so wish to grow.  After a few months, I decided on an alternate location that received approximately 6 hours of late morning to mid-afternoon sun...and now I could not wait to start planting!  


Raising the bed.

Listening to "You Bet Your Garden," hosted by Mike McGrath, ingrained in me the benefits of good soil and the disadvantages of clay soil.

A short story...the home my family now resides in has a septic tank.  This tank is buried somewhere in the backyard.  No one, including Rebecca's mother Ginny or Rebecca's grandfather Earl, the patriarch of this home, could with any certainly, tell me where the tank was buried.  Lawrence Township has no record of the location of the septic tank, and the company that would somewhat regularly pump this tank, did it improperly and poorly.  It was time to get it properly cleaned and checked and I had to locate it.  I began to dig in the vicinity of where Ginny said she thought it should be.  After approximately 21 days, I found the tank, buried 6 feet deep in clay rich soil.  Heavy, dense, clay soil.  How could anything grow here?  Anyway, tank got cleaned, riser installed, hole filled, end of story.

Clay rich soil.  If you were to attempt to deal with clay rich soil you would find it difficult without the use of heavy duty equipment.  Basically the tried and true method to amend clay soil is, to remove it and replace it with plenty of organic matter and compost.  I was not about to remove large quantities of soil, find a location to dump it and then haul in yards and yards of material to amend the existing location.  NOT GONNA HAPPEN!  Mr. McGrath would often reference "raised beds" for gardening in areas where the soil is suspect or in poor planting condition.  This seemed to me like a no brainer.  I would build a raised bed and avoid my native soil altogether.  I scoured the interwebs for a free raised garden bed plan that I could easily construct on site and found a gem on Sunset.com.  It seemed easy enough and I was all in.

Lessons learned

Farm to mind.

I worked for a restaurant group in Princeton, NJ for almost 3 years (2009-2012).  I was employed in each of their 3 restaurants.  One of which, Eno Terra, is a "farm to table" restaurant and therefore operates a farm (as you might imagine).  

My time with this restaurant company and specifically the time I spent in and around Eno Terra and One Acre Canal Farm introduced to me what farming/gardening may entail.  The bounty that is possible with A LOT of work and care and patience and water and compost and...well you get the idea.  And so my interest was piqued, and in my usual demeanor...I was extremely excited!  

My Nook Tablet.

Santa (AKA Rebecca) was good to me Christmas 2011 and I was gifted a Nook Tablet.  The idea was born when I gifted her a Nook Color a few months earlier, and she could barely put it down.  I began to download books on gardening, composting, "Square Foot Gardening," organic gardening...again, you get the idea.  At this time, I also stumbled upon a radio show some of you may have heard of, "You Bet Your Garden."  I must say, this show is absolutely full of great information, references and a website with links to just about any garden topic you could think of.  Mike McGrath is my idol...sort of.  It was Mr. McGrath that planted in my mind, the idea of using raised beds.  I came to the understanding that my shady garden, as seen here...
though once in a most glorious location, was now in a bad spot and if I was to have a successful growing experience, it had to be relocated!  The search was on.

Tuesday, March 19, 2013

Province Line Road

In the beginning...

Who would have thought I would end up on Province Line Road in Lawrence Township, NJ.  Growing up a world away (exactly 50.7 miles away) in Bayonne, NJ, I had never even heard of Lawrence (or as the traditionalists enjoy calling it, Lawrenceville).  Yet, here I am!  In the spring of 2008, my wife Rebecca, my son Fletch and I moved into Rebecca's grandparent's home. The split level was built on 2 acres of some old family farmland, about 50 years ago.


There was an existing garden in the back yard, and I am sure at the time it was built it was in the most perfect, full sun, well to do location on the entire lot. 
As you can see, life grows on and so did every tree planted in the landscape surrounding the property, shading the majority of the garden until the wee hours of the afternoon.  Never the less, in summer of 2008 I did what I thought was the proper thing, went ahead and planted my very first garden with tomatoes, garlic, peppers, corn and basil...with marginal success.  I do believe I harvested a handful of tomatoes, a pepper or two, a fair amount of basil, some barely recognizable corn and no garlic.  The best thing to come out of that garden was this...
a lady bug gift for Fletcher, courtesy of my cousin Jeff.

With renewed vigor!


Well...after 2 years hiatus, the spring of 2011 rolled around.  Some trees were trimmed in the landscape, the backyard got a wee bit more sun during the day, and so I decided to double the square footage of the garden.  I stripped the lawn adjacent to the garden, sunk in a bunch of new metal fence posts, ran some additional fencing and off I went.  The Sisk Family Farm was born!  I even thought it a good idea to try for the first time to start a few plants from seed indoors.  The usual suspects were on my mind, tomatoes, peppers, basil, corn (this land used to be a corn farm...I mean, how hard could it be?) with the addition of eggplant, morning glory, zinnia and sunflowers, which my son and I planted together.  As you could imagine, the seed starting was a complete failure.  I did manage to plant a garden with some plants I purchased from a few local nurseries and the H*** Depot.  Again, the harvest was fair, 20 or so tomatoes, a few peppers, some very small corn, and a couple of eggplant.  I even tried a version of the "Florida Weave" with my rows of tomatoes.
 FAIL!  I used a very "stretchy" bright orange roll of plastic tie that did not keep the tomato plants upright.  One success...
a few of the sunflowers grew to nearly 8'.  Fletcher was VERY pleased with his roll in our garden, and so was I.